The Perfboard-Arduino-inator lives!
It worked on the first try.
I want you to really sit with that for a moment. In the history of D.E.I., things working on the first try is not exactly a recurring theme. And yet here we are.
After working out the kinks with the Borduinoinator — including a hard-won lesson about the Arduino USB Serial Light Adapter (pro tip: hit the reset button right before uploading your sketch; you are welcome) — I decided it was time to stop prototyping and build something permanent. Following a pretty solid Instructable, I transferred the whole circuit onto perfboard.
And it worked. Immediately. On the first attempt. I did not even have time to prepare a backup plan, which, frankly, I always have.
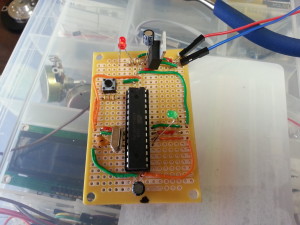
Design Notes from a Humble Genius
A few deliberate choices worth noting:
First, the red LED in the upper left corner. That little light indicates power flowing through the voltage regulator — something I found invaluable on the Borduinoinator and made sure to carry over. It is a small thing. It is also the difference between “is this thing on?” and knowing, with complete confidence, that yes, it is on. Evil Scientists should always know if their things are on.
Second, I used breadboard cross-connect wires for the cabling, which worked fine except for one small detail: they melt when you solder them. Good to know! I know it now. Next time I will use proper wire like a person.
Plans for the Next One
Because there will be a next one. A few improvements I am already planning:
- Move the power supply, as shown here — cleaner layout overall
- Run more connections on the underside traces instead of cabling on top — less visual chaos, more elegance
- Use wire that does not melt
- Self-destruct button — every proper Inator needs one, and frankly I am embarrassed it is not already on there
I will say this: keeping everything visible on top for this first build was actually very useful for debugging. I could see exactly what was connected to what. Future Doof will appreciate cleaner construction; Present Doof appreciated being able to see what was going on.
The Bottom Line
Total cost: $8.33. For a functional, permanent, standalone Arduino. That is not bad. That is, in fact, extremely good.
I will be returning to the breadboard for active development — mostly because my soldering skills are, let us say, “characterful” — but the perfboard model will be what powers the final Inators. Cheap, compact, and proven.
And now, as promised, the moment of triumph: a blinking LED.
Behold.
– Doof, Evil Scientist and Reluctant Solderer, Tri-State Area
Leave a Reply